Tuesday, September 27, 2011

Glittered Spiderweb Tutorial

Here are two more fun Halloween treat holders for you.

I wanted to share with you today another fun tip-
this one is how to add the chunky glitter on the spiderweb die cut (or any die cut).
These and my other Halloween bags and boxes can be seen on the Lifestyle Crafts blog today.
Click here for the link.

See how "super-glittery" this spiderweb is?  I love die-cutting glittered cardstock- but this time I used another technique.
First- I die cut the spiderweb using basic black cardstock.  Then, I ran it through my Xyron 5" Creative Station Machine using the permanent adhesive roll. (this is really a cool tool for quickly and painlessly covering die cuts like this one- with lots of tiny skinny elements-  in a complete layer of adhesive)
run it through (you just turn the handle) and it comes out the back like this:
Peel off both sides of the xyron paper. 
The adhesive is now covering the entire die cut.  Then just remove any adhesive sheet material that's in between the spiderweb by poking with a piercing tool.  It's super fast and easy and just pulls off.
(see my green Cricut "poking tool"?  It's got a bit of adhesive on it that I pulled off.  You just poke between each part of the spider web until it's all gone.
Now the adhesive should just be on the paper and no where else.
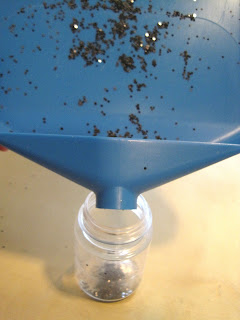
Then... I love using "Tidy Trays" for things like glitter, embossing powder, etc that you want to use on a project but not waste a bit of.  I have several sizes of trays, and should have used a bigger one for this, but this worked pretty well.  These trays like to have static, so use an "embossing buddy" and rub the inside of the tray to reduce static.
Then place your die-cut over the tidy tray and with the adhesive side up, pour your glitter all over the entire die cut.  Let the extra glitter fall into the Tidy Tray.
After the entire image is covered, turn the die-cut upside down and tap it to loosen any extra glitter into the tray. (see what I mean by needing to use the bigger size tray?  :)  lesson learned)
Now you can use the Tidy Tray to pour the extra glitter back into the bottle!
This used very little glitter.  My bottle was full again when I was done.
Now you've got a beautiful die cut, covered in chunky glitter!
Supplies:

Lifestyle Crafts dies from the "Be Spooked", (witch, tag, spiderweb border) "Sweet Simplicity" (gift bag die), "Possibilities" (nesting lace squares), and "Essentials" (matchbox) releases

Xyron 5" Creative Station Machine
Permanent Adhesive Roll by Xyron

For the Spiderweb Matchbox:
Lifestyle Crafts Matchbox die
Doodlebug chunky sugar coated glitter
Cardstock and Ribbon- Bo Bunny

For Halloween Gift Bag (top of page):
Lifestyle Crafts Gift Bag die
Cardstock, paper and ribbon- Bo Bunny
Glittered Cardstock- Best Creation, Inc.
Dimensional adhesive- Stampin' Up! Dimensionals

Thanks for visiting!

-Tiffany

Friday, September 23, 2011

"The Joy of Snow"

I absolutely love this photo of my son.  This was taken when he was 3.  We spent the day at a huge snow hill and daddy pulled this sled up the hill over and over, and then let it go as we watched him laugh.
This will be a two page layout documenting that magical day.  This is what I love about scrapbooking- getting out all those photos that are hidden away and remembering the little moments in life that are so worth re-living.  I think of it as documenting our lives- like a journal, that my children will be able to see over and over again.

Supplies:
Lifestyle Crafts dies- (all from the Possibilities and Be Splendid releases) Nesting lace rectangles, nesting lace ovals, nesting ovals, joy die, splendid alphabet, banners die, snowflake border die, fluorish border die.
Patterned paper- Echo Park "Wintertime"
Glittered cardstock- Best Creation, Inc.
Scallop border punch- Stampin' Up!
Solid cardstock- Stampin' Up!

Thanks for visiting.
-Tiffany

Thursday, September 22, 2011

Christmas Cards, Boxes, and Tags

 I'm loving the cooler air!  I'm so excited for the holidays.  Fall is my favorite time of year, and I'm getting in the mood for Halloween and Christmas.  I finally put up my Halloween decorations today- the kids were ecstatic.  They think I'm the coolest mom EVER for decorating our house like Halloween.

I am the coolest mom ever :)

But enough about Halloween (for now)- today I've got a few more Christmas ideas for you.....
This card features Lifestyle Crafts "Joy" and "Star" dies.  These two are some of my favorites from the new release.  You can see the newest shapes- "Be Splendid" on the Lifestyle Crafts website by clicking here.
 The dies are also great for making homemade gift tags.
The tags die set is beautiful.  I love the decorative edges.
These tags also feature several more dies in the "Be Splendid" release.
  
 and a fun box featuring the "snowflake border die"
The die is great on layouts (which I'll show you Friday) or separated into lots of smaller snowflakes.
I also used the "box with lids" "tag" and "nesting circles" dies.

Supplies:
Solid cardstock: Stampin' Up!
Glittered Cardstock: Doodlebug Sugar Coated cardstock in Lily White
Patterned paper: SEI
Ribbon and twine: Stampin' Up!

I'm spending the weekend making Halloween costumes for my boys.  Hope you're doing something fun and creative this weekend as well!

-Tiffany

Wednesday, September 21, 2011

Christmas Advent Calendar

This project will be in the 2012 Create:Holidays Idea Book by Northridge Publishing
to be released around October 2012.

I'm so excited to finally be able to show you this project!  Of all the projects I did for the "Be Splendid" release- for some reason this one came out exactly as I had it in my head, wasn't stressful at all, and came together in a day!  My layouts are another story- sometimes they'll sit on my desk for days un-glued before I decide they're the way I want them and finally get the courage to pull out the adhesive :)

This is a Christmas advent calendar that uses almost every die in the new release.  It was so much fun to put together each pocket, I love embellishments, and with these dies you can make your own.

(don't ask me what happened to #15- that's the beauty of sending projects
elsewhere to be used by the company you're designing for-
when you make your own, feel free to add a "15" to yours :)
I used a mecca of dies- the complete list can be found on the Lifestyle Crafts website today.

I used the Coin Envelope die for the pockets.
I recommend using a hot glue gun to glue the pockets to the beadboard.  This is just a piece of beadboard cut from a sheet from Lowe's or Home Depot.  I didn't even take the time to paint it-  it was already white.
The nice thing about the beadboard was it made it a breeze to evenly space the pockets.

Mr and Mrs Claus- so in love :)

The Lifestyle Crafts blog also has a list of what each pocket contains.

Each day is an activity to do with your family.

Patterned paper and solid cardstock: Stampin' Up!
Glittered cardstock: Doodlebug Sugar Coated Cardstock in Lily White
Ribbon, metal clips, and buttons- Stampin' Up!

-Tiffany

Tuesday, September 20, 2011

Be Splendid!

Introducing Lifestyle Crafts newest release of cutting dies- Be Splendid!
This beautiful collection is perfect for all your Christmas scrapbooking, card making, party planning, and gift giving crafting!
My first card features the "Santa Silhouette" die and the L Letterpress.
I used the "Jubilee" Holiday printing plates, letterpress paper, and red ink, which matches perfectly to Stampin' Up!'s "riding hood red" featured in the cardstock and ribbon.

You can see this die and the rest of the release here on the Lifestyle Crafts website. Keep an eye on my blog this week- I'll be showing you more of my designs using these dies.

In the meantime- the Lifestyle Crafts blog has a giveaway!  Go here to enter!

-Tiffany

Monday, September 19, 2011

Preview of Tomorrow's Release! And More Be Spooked! Projects

Sneak peek of tomorrow's release from Lifestyle Crafts:
Are you SO excited!!??!!!
I can't wait to show you some beautiful Christmas projects.

Before we move on to Christmas, here are a couple more of my projects from the
"Be Spooked, Be Stuffed" release.
Super simple, easy treat bags anyone can re-create for your Halloween parties!
 Supplies: Cracker box die, cat die, tag die
Patterned paper: Bo Bunny
Twine: The Twinery
Glittered Cardstock: Best Creation, Inc.
 Supplies: Witch Kit Die, Nesting Scallop Ovals, Paper bag die
Patterned paper: Bo Bunny, Imaginisce
Glittered cardstock: Best Creation, Inc

-Tiffany

Thursday, September 15, 2011

Doodlebug Design Team Announcement!

Doodlebug Design Inc announced their Design Team this morning for 2011-2012 and I'm pleased to announced that I was chosen to be on the team!  I am so excited for this wonderful opportunity and feel blessed to be working with such a talented group of people this year. 

The Design Team for 2011-2012 is:

Aphra Bolyer (LA)

Elizabeth Carney (WA)

Jessy Christopher  (Malaysia)

Jing-Jing Nickel (MN)

Kandis Smith  (ID)

Kathy Martin (NC)

Lori Allred (Coordinator)


Melinda Spinks (Australia)

Monique Liedtke  (Netherlands)

Nancy Damiano (NJ)

Stephanie Buice  (AL)

Rosangela Philippsen (Brazil)

Sherry Cartwright  (TX)

Tiffany Hood (UT)

Wendy Sue Anderson (UT)
Keep an eye on the Doodlebug Blog next week when they'll be showcasing each member of the team and helping you to get to know each of them a little better.  They'll also have fun giveaways!
And if you didn't already get a chance to see my Design Team entry projects, you can see them here.


Monday, September 12, 2011

Lifestyle Crafts "Bats" die

Get some great ideas on how to use the "bats" die on the Lifestyle Crafts blog here.
I've been thinking so much about Halloween lately, I think I'll get out my Halloween decorations today.
It's not too soon, right?
I LOVE Halloween!!!
This layout is of my boys and my husband carving pumpkins last year.  They both drew their own faces on their pumpkins and then we helped carve them.  The layout features the dimensional tree die, bats die, pumpkin die, tag die, spiderweb border die, nesting frames 2, and the Spooked Letterpress plates.
You can find the dies on the Lifestyle Crafts website here.
And go here to see more fun ideas from the design team.

Additional Supplies:
Patterned paper: Making Memories and Best Creation, Inc.
Cardstock: Stampin' Up!
Ribbon: Making Memories

-Tiffany

Thursday, September 8, 2011

Halloween Mini Album

I've had so much fun playing with
"Monster Mania"!  
It just might take "Nifty Notions" place as my favorite paper line.

Everyone who knows me well knows that Halloween is my favorite holiday, and I've been wanting to do a mini-album for a long time for my kids to look at and remember their costumes from year to year.  They had a lot of fun tonight looking at it, and so did my husband.
And look who made the front cover!  My favorite blue monster!  Right where he belongs :)
So CUTE I can't stand it!
I'm missing a few photos for the album since my Mac is in "surgery" getting
a new power supply, but here you go:


And some close-ups:


Can't wait to add to it this Halloween!

Supplies:
Binding Tool: Cinch by WeR Memory Keepers
Multi-media album- Fancy Pants
Patterned paper, stickers, bakers twine, cardstock icons- Doodlebug Design
Ribbon- American Crafts, Offray, Celebrate It, Stampin' Up!, Bo Bunny
Brads: Stampin' Up!
Custom "eyeball" brad: made with i top brad maker by Imaginisce
Buttons: Stampin' Up, craft supply
Punches: Drippy Goo- Martha Stewart Crafts, Scallop Edge- Stampin' Up!
Solid cardstock- Stampin' Up!
Die Cut Numbers- Cricut Expression, Birthday Bash cartridge

Lifestyle Crafts "Be Spooked Be Stuffed" Release!

Lifestyle Crafts has released part of it's new holiday release, perfect for Halloween, Thanksgiving and Fall.
Check out "Be Spooked Be Stuffed" here on their website.
And watch next month for the rest of the holiday release, Christmas!

Watch their blog and facebook page daily for fun projects and giveaways!
and see here for some of the design team's great projects with this release
They haven't finished posting them all, but there are a lot of great project ideas there :)

Here are the fun shapes!
Doesn't it get you excited for fall?


Wednesday, September 7, 2011

5 Minute Card for my Cute Boy

My sweet but accident-prone 5 year old boy broke his foot and we've spent the entire morning at the doctor's office, at the pharmacy, and getting crutches. He's had a rough day. He has to stay home from school today and keep his leg up so the swelling can go down, then he gets a "sweet green cast" on Friday. 
(He's excited about that).

He loves the "monster paper" mommy's been playing with. I FINALLY got my hands on the Monster Mania collection! And the cute blue monster that's been on my facebook page is now IN MY HOUSE! He's too cute to use!
So I decided to make my son a quick card to make him smile, and got him a "sweet green slushie" and some treats.
Cute, huh?  My husband liked it, and my son lit up :)
The little purple guy's now watching my son play video games with his googly eye :)

Here's our morning adventure:


He's actually pretty good on the crutches already.

And here's a picture of my darling daughter with her black eye she got over the weekend falling down the metal stairs of the trailer we camped in.
Guess what I was feeling taking my two broken children to the doctor's office?
"Yeah- they're going to call DCFS"
Isn't she cute?
Hopefully they'll both be healed by Halloween, or I can make them pirates.
One with an eye patch and one with a peg leg.
Ha ha ha.......I kill me :)

Monday, September 5, 2011

Doodlebug Design Team Entries

Doodlebug gave us permission to go ahead and post our entries, so here they are!
We were asked to create one layout, two cards, and one mini album or home decor item.  

All of my entries use 100% Doodlebug Design Inc. items with the exception of the ribbon on the last project.

This first card was inspired by part of Doodlebug's CHA booth (click here to see it, so cute)
I designed the window with Cricut Design Studio and the George and Basic Shapes cartridge and lots of welding.  Then I cut it using my Cricut machine.

 The second card uses a Doodlebug Create-A-Card lots of Doodlebug bling!  I fell in love with the icons stickers and knew just what I was going to do with them.


 My layout is of my oldest son on his 4th birthday.  He was so excited to get the Diego cake he wanted, and didn't want me to make him a cake.  I'll add journaling to the layout.  It also uses the Doodlebug Doodle Twine that I won on their blog!


 And this is my home decor item.  This one was so much fun to make.  This is the project where I used the rosettes from my rosette tutorial.  It's the cutest, most sparkly pendant banner, and I'm so excited to use it for my daughter's birthday next month!


Wish me luck!
What do you think?
Related Posts Plugin for WordPress, Blogger...