Here are two more fun Halloween treat holders for you.
I wanted to share with you today another fun tip-
this one is how to add the chunky glitter on the spiderweb die cut (or any die cut).
These and my other Halloween bags and boxes can be seen on the Lifestyle Crafts blog today.
Click here for the link.
I wanted to share with you today another fun tip-
this one is how to add the chunky glitter on the spiderweb die cut (or any die cut).
These and my other Halloween bags and boxes can be seen on the Lifestyle Crafts blog today.
Click here for the link.
See how "super-glittery" this spiderweb is? I love die-cutting glittered cardstock- but this time I used another technique.
First- I die cut the spiderweb using basic black cardstock. Then, I ran it through my Xyron 5" Creative Station Machine using the permanent adhesive roll. (this is really a cool tool for quickly and painlessly covering die cuts like this one- with lots of tiny skinny elements- in a complete layer of adhesive)
Peel off both sides of the xyron paper.
The adhesive is now covering the entire die cut. Then just remove any adhesive sheet material that's in between the spiderweb by poking with a piercing tool. It's super fast and easy and just pulls off.
(see my green Cricut "poking tool"? It's got a bit of adhesive on it that I pulled off. You just poke between each part of the spider web until it's all gone.
Now the adhesive should just be on the paper and no where else.
Then... I love using "Tidy Trays" for things like glitter, embossing powder, etc that you want to use on a project but not waste a bit of. I have several sizes of trays, and should have used a bigger one for this, but this worked pretty well. These trays like to have static, so use an "embossing buddy" and rub the inside of the tray to reduce static.
Then place your die-cut over the tidy tray and with the adhesive side up, pour your glitter all over the entire die cut. Let the extra glitter fall into the Tidy Tray.
After the entire image is covered, turn the die-cut upside down and tap it to loosen any extra glitter into the tray. (see what I mean by needing to use the bigger size tray? :) lesson learned)
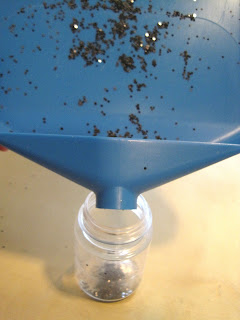
Now you can use the Tidy Tray to pour the extra glitter back into the bottle!
This used very little glitter. My bottle was full again when I was done.
Now you've got a beautiful die cut, covered in chunky glitter!
Supplies:
Lifestyle Crafts dies from the "Be Spooked", (witch, tag, spiderweb border) "Sweet Simplicity" (gift bag die), "Possibilities" (nesting lace squares), and "Essentials" (matchbox) releases
Xyron 5" Creative Station Machine
Permanent Adhesive Roll by Xyron
Lifestyle Crafts dies from the "Be Spooked", (witch, tag, spiderweb border) "Sweet Simplicity" (gift bag die), "Possibilities" (nesting lace squares), and "Essentials" (matchbox) releases
Xyron 5" Creative Station Machine
Permanent Adhesive Roll by Xyron
For the Spiderweb Matchbox:
Lifestyle Crafts Matchbox die
Doodlebug chunky sugar coated glitter
Cardstock and Ribbon- Bo Bunny
For Halloween Gift Bag (top of page):
Lifestyle Crafts Gift Bag die
Cardstock, paper and ribbon- Bo Bunny
Glittered Cardstock- Best Creation, Inc.
Dimensional adhesive- Stampin' Up! Dimensionals
Thanks for visiting!
-Tiffany


No comments:
Post a Comment